

How To Tie the Clove Hitch
Usage
The Clove Hitch is used to attach a rope to a pole, tree, or other cylindrical objects. It is highly valued in situations where you need to secure a line quickly, like in camping, bushcraft, climbing, and boating. However, it is considered a temporary knot due to its tendency to slip and should not be used for load-bearing purposes on its own.
Why Learn the Knot
The Clove Hitch is one of the quickest and simplest knots to tie, making it invaluable for outdoor enthusiasts. Its ability to adjust easily on the fly makes it ideal for activities like setting up tripods, hanging gear, and starting lashings for shelter or other bushcraft structures. Additionally, its straightforward structure allows for easy untying and adjustment, which is critical in temporary or quickly adaptable setups.
You can also pull up the Clove Hitch inside the Knot IQ app, which shows a 3D model you can spin around while you follow each step, and grabbing a length of Premium Bushcraft Paracord to practice on will make the motion stick faster.
Common Uses
- Camping and Bushcraft:
- Start or finish lashings when building shelters, furniture, or other structures.
- Create a quick hanging loop for gear, bags, or lanterns off the ground.
- Bundle sticks or ropes for easy transport.
- Scouts:
- Widely used in lashing projects, such as square or tripod lashing.
- Secure poles in pioneering tasks and improvised stretcher building.
- Climbing:
- Used to attach ropes to anchors and carabiners for temporary setups.
- Allows easy adjustment along the rope for repositioning.
- Household:
- Bind a bundle of garden stakes, tools, or similar items for storage.
- Secure bags or sacks temporarily.
ABOK Number
(Ashley Book of Knots)
Other Names
CategoryHitch
Binding Knot
|
Notable Features
- Adjustable: The Clove Hitch can be loosened and adjusted by feeding rope through either end.
- Quick to Tie: Known for its simplicity and speed, it’s ideal for temporary applications.
- Slippage Risk: The knot can slip if the standing end is pulled in the wrong direction or if tied around smooth or square objects.
- Variations: The Clove has numerous variations for practically every type of use.
Similar Knots
Square Knot (Reef Knot) vs. The Clove Hitch
- Pros: In the square knot comparison, it is quick to tie and untie, often used for binding objects together, especially for securing bundles.
- Cons: Less secure than the Clove Hitch for attaching a rope to a fixed object, and it may slip if not kept under constant tension.
Constrictor Knot vs. The Clove Hitch
- Pros: Extremely secure and binding, the Constrictor Knot is excellent for permanent or load-bearing purposes where slippage is a concern.
- Cons: Difficult to untie once tightened, making it unsuitable for applications where the knot needs to be adjusted or quickly undone.
Sack Knot vs. The Clove Hitch
- Pros: Simple to tie and untie, the Sack Knot is often used for temporarily sealing bags or sacks and holds well when there is minimal movement.
- Cons: Not as versatile as the Clove Hitch for securing to a pole or cylindrical object, and may loosen if not held under tension.
Clove Hitch on a Bight vs. The Standard Clove Hitch
- Pros: The mid-line Clove Hitch on a Bight allows you to create a clove hitch without access to the rope ends, making it useful for tying around fixed or tensioned lines.
- Cons: Slightly bulkier and requires more precision to ensure a secure hold compared to a standard Clove Hitch.
Slipped Clove Hitch vs. The Standard Clove Hitch
- Pros: The Slipped Clove Hitch is a quick-release version of the Clove Hitch, allowing the knot to be undone easily by pulling on the slipped end, which is especially useful for temporary setups.
- Cons: Less secure than a standard Clove Hitch under heavy loads, as the slipped portion may loosen if not closely monitored.
History
The Clove Hitch is an ancient knot that dates back to the 16th century and was traditionally used for securing ratlines on ships. The knot’s simplicity and effectiveness have made it a staple in various fields, including sailing, scouting, climbing, and bushcraft. Despite its age, it remains a foundational knot taught to beginners and used by experts alike for its versatility and ease of use.
Security Level
The Clove Hitch is considered low-security by itself, as it can slip or loosen under load, especially on smooth surfaces or when tied around square objects. It’s best used in non-load-bearing applications or in situations where it can be backed up with additional knots or half hitches for increased stability.
Downsides
Risk of Slipping: Without a backup, the Clove Hitch can slip, especially under heavy load or on smooth surfaces.
Binding Issue: While it rarely jams, excessive load can cause the knot to tighten around cylindrical objects, making it challenging to adjust.
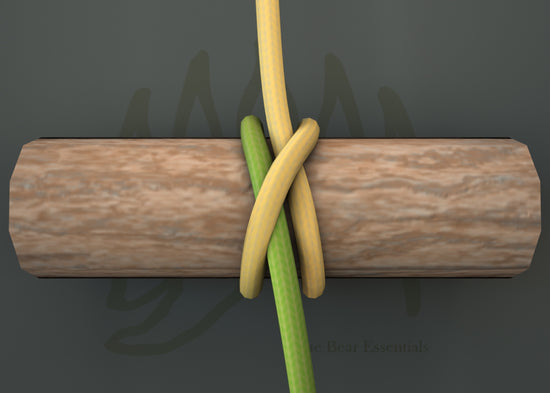
Structure
Method 1: Basic Clove Hitch
- Wrap the rope around a pole or object horizontally.
- Cross the working end back over itself, creating an “X” shape.
- Pull the working end down and thread it through the center of the “X.”
- Tighten by pulling both ends firmly.
Method 2: Overhand Loops
- Create two loops with the rope, one over the other.
- Place the second loop over the first and pull both ends to tighten around a pole.
FAQ
What is the main use of the Clove Hitch?
The Clove Hitch is often used to secure a rope quickly to a pole or tree in non-load-bearing applications. It’s also popular for starting lashings in various camp structures.
Can the Clove Hitch slip?
Yes, the Clove Hitch can slip under load, especially if not backed up with an additional half hitch or stopper knot. It’s best for temporary or low-tension uses.
Is the Clove Hitch suitable for climbing?
While it’s used in climbing for temporary attachments to carabiners or anchors, it should be backed up or used cautiously, as it’s not recommended for life-critical loads.
What’s the difference between a Clove Hitch and a Bowline?
The Clove Hitch attaches a rope to an object quickly, while the Bowline creates a secure loop at the rope’s end. The Bowline is far more stable for load-bearing purposes.
Can I make the Clove Hitch more secure?
Yes, you can add a half hitch knot or a stopper knot. can increase the security of a Clove Hitch, especially when used on smooth surfaces.
Important Notes on Safety
The Clove Hitch is not intended for load-bearing uses by itself and can slip under strain. Avoid using it alone in any critical situations, like climbing or securing heavy loads. Always check the knot for security before use, and back it up if needed.


![Tarp Ridgeline Kit [Cordage Bundle] - The Bear Essentials Outdoors Co., , ,](http://thebearessentials.com/cdn/shop/files/tarp-ridgeline-kit-cordage-bundle-8380710.jpg?v=1767634331&width=533)
