

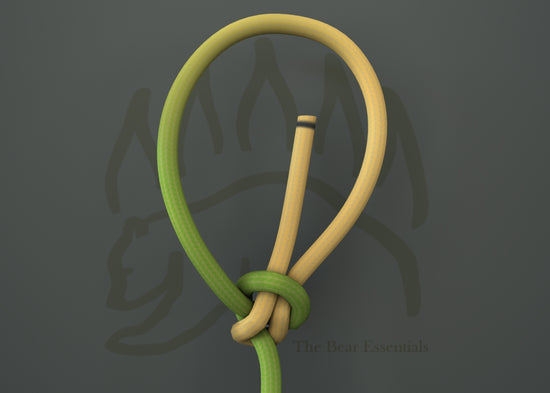
How To Tie the Bowline Knot
Usage
The Bowline Knot, aka “The King of Knots” is one of the most trusted loop knots in both outdoor and rescue settings. It forms a secure, fixed loop at the end of a rope that won’t slip or jam under load, making it ideal for anchoring, tying around objects, or creating loops for pulling. Its stability under load and simplicity in tying and untying have made it a go-to for campers, climbers, sailors, and bushcraft enthusiasts alike.
Why Learn the Knot
The Bowline Knot is one you definitely want to learn as it’s the gold standard anchor knot. Anyone with a decent familiarity with knots will be able to recognize its unique look. Its simplicity and reliability make it perfect for situations where a strong, non-slip loop is needed, yet it can be untied quickly and easily, even after bearing significant weight. Knowing how to tie the Bowline opens up numerous possibilities for securely handling gear, setting up anchor points, and even in emergency rescues.
Want to see it from every angle before you tie it? The Knot IQ app lets you rotate a 3D animation of the Bowline step by step, and it's a good idea to practice on a length of Premium Bushcraft Paracord until it becomes second nature.
Common Uses
- Camping and Bushcraft:
- Tying down tarps or hammocks by creating stable anchor points.
- Setting up bear hangs or food storage lines.
- Forming loops to pull heavy logs or secure equipment.
- Anchoring any ridgelines for tarps or guylines on tents.
- Climbing and Rescue:
- Tying fixed loops for belaying or rappelling.
- Using as a secure loop for emergency rescues.
- Providing anchor points in complex rigging setups.
- General Outdoor and Household Applications:
- Securing loads for transport, such as on a vehicle or trailer.
- Creating loops for securing tents or canopies.
- Using as a reliable knot in boating for attaching lines to cleats or posts.
ABOK Number(Ashley Book of Knots)
Other Names
TypeEnd Loop / Anchor Knot |
Variations
Water Bowline vs Bowline
- Pros: Better in wet environments; more secure in slippery conditions.
- Cons: Slightly more complex to tie than the standard Bowline
Running Bowline vs Bowline
- Pros: Forms a noose that tightens under load; excellent for tree work or pulling objects.
- Cons: Not suitable where a fixed loop is needed.
Double Bowline vs Bowline
- Pros: Provides additional security for critical applications like climbing.
- Cons: Slightly bulkier and takes longer to tie.
Bowline with Yosemite Finish vs Bowline
- Pros: Adds security to prevent slippage; ideal for climbing.
- Cons: Slightly more complex due to the Yosemite finish.
Eskimo Bowline vs Bowline
- Pros: Works well under multidirectional load.
-
Cons: Less intuitive to tie than the standard Bowline.
Notable Features
- Secure, Fixed Loop: Holds its shape and stability under tension without slipping or jamming.
- Easy to Untie: Despite its strong hold, the Bowline is simple to untie, even after heavy loading.
- Versatile Applications: Works well in various scenarios, from securing loads to setting up anchors or loops for pulling.
Similar Knots
Figure Eight Follow Through vs The Bowline
- Pros: Known for its high security and stability, the Figure Eight Follow Through is commonly used in climbing as a tie-in knot. It provides a secure loop that won’t slip, even under high loads.
- Cons: More complex to tie than the Bowline, and it can jam after bearing heavy loads, making it harder to untie compared to the Bowline.
Perfection Loop (Angler’s Loop) vs The Bowline
- Pros: Creates a small, stable loop that’s popular for fishing and angling; offers a neat, compact knot that’s secure under load.
- Cons: Less versatile than the Bowline for general purposes; it’s more specialized and doesn’t perform as well under multi-directional tension.
Double Dragon Loop Knot - Rope End Method vs The Bowline
- Pros: Exceptionally secure under load and relatively easy to untie after tension, even with heavy weights. Works well in applications that require a stable, rope-end loop.
- Cons: More complex than the Bowline, requiring more practice to tie and secure correctly. Its structure is bulkier, which may not be ideal for quick setups.
Zeppelin Loop vs The Bowline
- Pros: Extremely secure and resistant to jamming, the Zeppelin Loop is a stable choice for creating a fixed loop that handles tension well.
- Cons: More intricate to tie than the Bowline, and it takes longer to secure. It’s also less well-known, making it harder to learn and teach.
Round Turn and Two-Half Hitches vs The Bowline
- Pros: The Round Turn Hitch is easy to tie and untie, making it a good option for temporary holds, especially in boating and marine applications. It holds reliably under tension and works well for securing loads.
- Cons: Not as strong as the Bowline for creating a fixed, stable loop; this knot is better suited for anchoring or securing ropes to objects rather than forming loops.
Yosemite Bowline vs The Bowline
- Pros: Adds an extra layer of security to the Bowline, preventing potential slippage and making it more reliable for life-critical applications like climbing. Ideal for situations requiring greater safety and stability.
- Cons: Slightly more complex than the traditional Bowline due to the added Yosemite finish, requiring an extra step that might slow down tying in urgent scenarios.
History
The Bowline Knot, often called the "King of Knots," has a rich history that dates back centuries, especially in sailing and maritime applications. Originally used by sailors to secure lines and create fixed loops, its stability and ease of untying made it essential in situations where reliability and efficiency were paramount. Over time, its applications extended to camping, climbing, and rescue operations, where it remains a favoured choice for creating quick, secure loops that withstand high tension without slipping or jamming.
Security Level
The Bowline Knot is highly secure for most non-life-critical applications. While stable and secure under normal tension, it may loosen if not consistently loaded or if exposed to cyclic loads. For high-stakes applications like climbing, variants such as Double Bowline or Yosemite Bowline are often preferred for added safety.
Downsides
- Can Loosen Under Cyclic Load: The Bowline may slip if alternately loaded and unloaded, especially if not properly tied or secured.
- Not as Strong in Multi-Directional Loading: The knot is secure under unidirectional load but may distort if pulled from varying angles.
- Lacks Shock Absorption: Unlike some other loop knots, the Bowline does not absorb dynamic loads as effectively.
Structure
- Step 1: Form a small loop near the rope’s end, leaving a generous tail.
- Step 2: Pass the working end up through the loop.
- Step 3: Wrap the working end around the standing part.
- Step 4: Bring the working end back down and through the loop.
- Step 5: Pull the standing part to tighten, securing the knot and adjusting the loop as needed.
FAQ
What is the Bowline Knot used for?
The Bowline Knot is commonly used to create secure, fixed loops in a rope for camping, climbing, rescue, and boating applications.
Is the Bowline Knot secure enough for climbing?
While the Bowline is reliable, climbers often prefer variants like the Double or Yosemite Bowline for added security in life-critical situations.
Can the Bowline Knot be used for camping?
Yes, it’s frequently used for camping tasks like tying down tarps, setting up shelters, and securing gear.
How does the Bowline Knot compare to the Figure Eight Loop?
The Bowline is faster to tie and easier to untie, while the Figure Eight Loop offers slightly more security under heavy load but can jam more easily.
Is the Bowline Knot easy to untie after heavy loads?
Yes, one of the Bowline’s best features is its ease of untying, even after bearing heavy weight, which is why it’s favoured for temporary setups.
Important Notes on Safety
The Bowline Knot is reliable and easy to tie, but it’s not suited for dynamic loads or life-critical situations without reinforcement. Always verify its security and consider using variants like the Double Bowline in high-stakes applications.


![Tarp Ridgeline Kit [Cordage Bundle] - The Bear Essentials Outdoors Co., , ,](http://thebearessentials.com/cdn/shop/files/tarp-ridgeline-kit-cordage-bundle-8380710.jpg?v=1767634331&width=533)

2 comments
DJ this is incredible stuff! I just found your website and it is now my official resource for all things knots. Amazing job on everything.
great site